|
Introduction
This tutorial will guide you through the steps in making
a dark, prison cell enviornment. Techniques used will include Radiosity,
Caustic & Volumetric Lighting. If you are only interested in the
Lighting & Rendering part of this tutorial you can download the
prisoncell object from the downloads
section.
Step 1 - Modeling
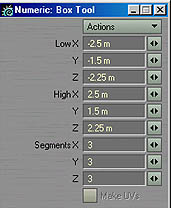
Load up Modeler to start out with. Click the box tool and
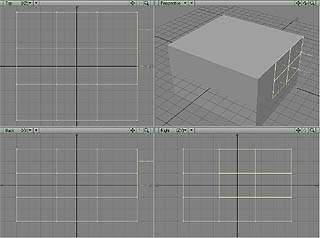
hit n to do a numeric entry. Enter the values shown in figure 1. Now
select the 4 polygons in the upper right hand corner of the right side
of the cube as shown in figure 2. Hit shift+d to subdivide these polygons
and then select only the two shown in figure 3. Delete those two polygons.
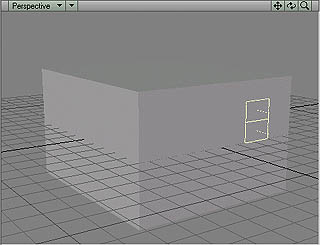
Make sure nothing is selected and hit f on the keyboard to flip the
polygons around. Now we have a view for the inside of the prison cell.
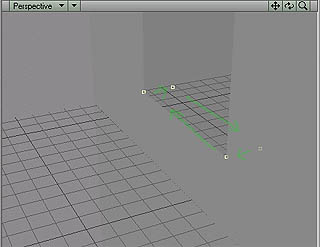
Ok now find your window and select the points surrounding it. Copy the
4 corner points of the window and paste these into a new layer and position
them as shown in figure 4.
(Note - for this and the next process I normally change my top left
viewbox to perspective to make for easier point selection.)
Cut and paste those 4 points back into the original layer. I thought
that my window was a little too big so I moved the bottom 4 points up
a little bit ( you don't have to, whatever looks right to you ). Now
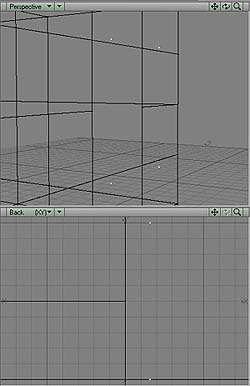
we need to select the points individually and make some polygons. The
points must be selected in clockwise order and like I said before, changing
your top left view to perspective makes it a lot easier to select these
points. Figure 5 shows how to select the points. We will need to add
4 polygons to create the window inset so select the bottom 4 points
in clockwise order and hit p to make a polygon. Your right side perspective
view should show a new polygon created there. Repeat this process for
each of the other 3 inside surfaces of the window inset.
Now to finish up the basic geometry for the cell, hit shift+t to triple
all the polygons. Hit shift+d and choose faceted with 75% fractal. You
may do this again if you like, but I recommend keeping polygon counts
low for this tutorial as the final render will take a long time since
we will be using Radiosity. Hit q and name everything "Prisonwalls"
or something.
The last thing we need for the prison is a few bars to go in the window.
Use the disc tool to create 4 evenly spaced bars positioned inside the
window. Give these polygons a surface called "Bars". Now we're
finished with the essential modeling. In addition to this, you may want
to model a foreground object such as a skeleton chained to a wall etc...
( Remember, try to use models that have as few polygons as possible
unless you have a killer machine! )
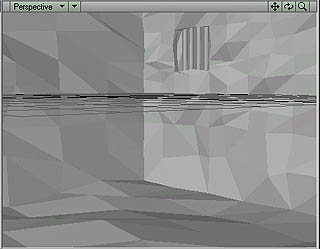
Your model should now resemble figure 6. (Ignore the grid) Save your
work and close Modeler.
Step 2 - Surfacing
Now we're done with Modeler so load up Layout. Add the prisoncell object
to you scene. Hit d to enter display options and change the grid size
to 500mm. Now move your camera to X-577.372mm Y -398.744mm Z -1.8271
m Rotation to H 42.50 P 0 B 0. With the camera selected hit p and change
the zoom factor to 1.549. Now hit 6 to enter Camera View and then open
Rendering options. Click on Enable viper and render the frame (F9).
Open surface editor and click on Viper which will open the viper display
window. If it starts to run slow then check draft mode to improve response
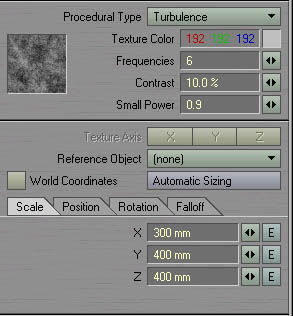
time. Select the prison walls then check smoothing and darken the default
grey color to something like 128 128 128. Change the diffuse to 60%
and click the T beside color. Change the layer type to procedural and
select the values shown in figure 7. Click on the T beside of bump,
select procedural as the layer type and keep the default settings except
change the layer opacity to 80% and the texture value to 90%. Add another
layer and make this one Crumple. Change the scale to 200mm on all axes.
For the Bars surface, make it black, diffuse 40%, specularity 20% glossiness
40% and check smoothing. Now that's it for texturing ( if you have a
foreground object go ahead and texture that now).
Step 3 - Lighting & Scene Setup
Well some of you, I'm sure, have better computers than I do but at this
point my renders start slowing down a considerable amount now that we
have the texture in the scene. I recommend that you go to the camera
properties panel and change the resolution modifier to 50% in order
to speed up render times.
The first thing we need to do is setup the basic values for the scene.
Goto the Scene tab and click on backdrop. Change the color to 199 200
185. Now click on the lights panel and click on global illumination.
Change the Ambient Intensity to 3% ( leave the rest alone for now.)
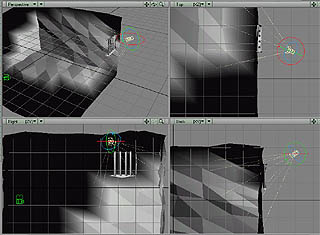
Change the light type to spot light and position it as shown in figure
7. Use light view (5) to make sure that it is pointing down into the
window and hitting the wall at least some. On the light properties panel,
change the light's color to 255 255 221 & shadow type to shadow
map ( for now ). Go ahead and do a test render to see what you have
so far. Notice a few problems we have that need to be fixed. One is
that the area that is not directly being hit by light is completely
dark which is unrealistic. Radiosity will fix this. Radiosity calculates
how the rays of light will bounce off surfaces and affect other surfaces.
Another problem is that the light has no rays. Simple volumetric lighting
will fix that. On the light's property box, click on volumetric lighting
& then volumetric light options. Height 7m, Attenuation 20%, Specify
medium color - 255 255 179 and uncheck enable texture. Leave the quality
on medium for now ( or low ). Hit F9 and see what you have now. If you
have an object in the scene, make sure you have it where you want it.
Go ahead and make any other final changes to the scene that you want.
That's it for lighting.
Step 4 - Rendering
Ok now that we're ready to render lets go ahead and make sure everything
is set up properly. In the light properties panel, change the volumetric
light's quality to best. Change the light's shadow type back to ray
trace. In the camera properties panel change the resolution modifier
back to 100% and set anti-aliasing to low. Click on the Lights tab and
select global illumination again. Click enable radiosity, cache radiosity,
enable caustics, cache caustics. Click on Rendering - rendering options.
Select Ray Trace Shadows and Extra Ray Trace Optimization. Make sure
that Render Display is set to Image Viewer or Image Viewer FP. Alright
that should be it, you're ready to render. Save your scene and save
all objects before you render and remember, due to the high settings
this could take quite a while to render. With those settings it took
me more than 45 minutes to render the frame on a p3 650.
Step 5 - Post-render work
The render doesn't come out perfect for whatever reason. That's about
as best as I could get it to look due to the darkness and everything.
So what we end up with is a fairly decent image with some over sampling
in it. You can use any image editing program with some decent plugins
to fix these up. I used Photoshop 5.5. I used the sharpen and despeckle
filters to make the overall image look better then I used the blur tool
to fix up a lot of the splotches.
Additionally, you may want to add more realism to the image by adding
dust in the air. I used the pencil tool with varying degrees of opacity
ranging from 5% - 30% to make the dots. Make the color a very light
grey and just click a bunch of random points until it looks good to
you. I couldn't figure out a way to make the dust in Lightwave, nothing
I tried seemed to look right. Well that's about all folks, I hope this
tutorial has been of some use to you.
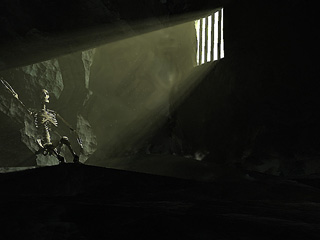
Figure 8 shows a finished image. A full size image can be seen in the
gallery.
|